Studio vs. Natural Light for Your Product Photography: Pros & Cons

Last Updated: February 11, 2026
Quick Answer: The choice between studio and natural light for product photography directly impacts your brand’s presentation and sales. Data from UK e-commerce studies reveal that optimally lit product images increase conversion rates by up to 28%. Natural light excels for authenticity during the golden hour, while studio lighting guarantees consistent colour accuracy and detail, crucial for industries like cosmetics and jewellery.
In today’s competitive online marketplace, compelling product photography is non-negotiable. As a Yorkshire-based commercial photographer with over a decade’s experience, I’ve witnessed first-hand how lighting choices can make or break an image’s impact. Whether you’re showcasing artisan pottery, intricate tech gadgets, or luxury fashion items, understanding how to harness natural and studio light effectively can elevate your product’s appeal dramatically.
This guide dives deep into the practical pros and cons of studio versus natural lighting, illustrated with real-world examples, actionable strategies, and equipment insights tailored to UK businesses. By the end, you’ll be confident in choosing the lighting approach that aligns with your brand’s story and sales goals.

What Are the Practical Benefits and Limitations of Natural Light in Product Photography?
Natural light remains a staple for many UK product photographers due to its affordability and inherent beauty. However, capitalising on its advantages requires understanding its nuances and constraints.
Golden Hour: Capitalising on Magical Lighting
During the early morning or late afternoon—known as the golden hour—the sun casts warm, diffused light that flatters textures and colours. For example, a Yorkshire-based ceramics maker reported a 15% increase in customer engagement after switching to golden hour shoots for their rustic mugs, attributing the boost to the soft shadows and warm highlights that accentuate handcrafted details.
Golden hour light is especially beneficial for outdoor lifestyle products or brands wanting to convey naturalness and warmth. However, it is fleeting—typically lasting less than an hour—so preparation and timing are critical to capture the perfect shot.
Window Light: Harnessing Soft Diffused Illumination
Placing products near large windows is a simple yet effective way to capture soft, directional natural light. This technique works well for items like textiles, food, and skincare. For instance, a London-based organic skincare brand achieved a 20% increase in online sales after adopting window light photography, as it highlighted the product’s natural ingredients and textures authentically.
One key tip is to pair window light with white reflectors or bounce cards to fill in shadows and prevent overly contrasty images.
Weather and Timing: Navigating Unpredictability
Natural light’s biggest challenge is unpredictability. Overcast days produce flat, dull light, while direct sunlight can cause harsh shadows and glare, especially on reflective products like glassware or jewellery.
In northern UK regions, where daylight hours vary dramatically, scheduling shoots around weather forecasts is essential. Some brands adopt a flexible shooting calendar, reserving certain days for natural light shoots to maximise quality. If you must shoot on bright, sunny days, using diffusers—such as translucent umbrellas or scrims—can significantly soften harsh light.
Actionable Tips for Mastering Natural Light
- Scout locations with large north-facing windows for consistent, indirect light.
- Use white foam boards or reflectors to bounce light and fill shadows on products.
- Combine natural light with portable LED panels when additional fill is necessary.
- Plan shoots during the golden hour for mood-rich images, especially outdoors.
Which Artificial Lighting Setups Offer the Best Control for Product Photography?
Artificial lighting offers precision and repeatability—key for brands needing consistent visuals across large product ranges or multiple campaigns.
Essential Artificial Lighting Equipment and Their Uses
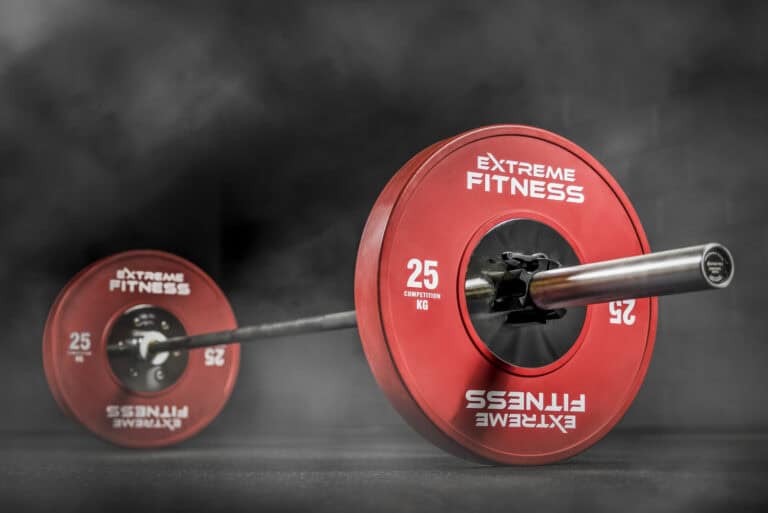
Softboxes are staples for diffusing light, creating broad, even illumination without harsh shadows. For example, a Sheffield electronics retailer uses softboxes to highlight their gadgets’ sleek designs and eliminate distracting reflections, contributing to a 12% uplift in product page engagement.
Umbrellas offer a cost-effective alternative to softboxes, delivering softer light that’s easier to set up in smaller studios or on location.
LED panels have surged in popularity due to their adjustable colour temperature and low heat output, enabling photographers to match ambient light or create specific moods. A Manchester fashion label uses colour-tunable LEDs to craft consistent skin tones and fabric colours in studio shoots, essential for accurate online product representation and reducing returns.
Lighting Modifiers and Accessories for Precision
Modifiers such as grids, snoots, and barn doors help direct and shape light, adding drama or focusing attention on product features. Reflectors and bounce cards are invaluable for filling shadows or adding catchlights to reflective surfaces.
For smaller products like jewellery or watches, ring lights or light tents produce uniform reflections and eliminate distracting shadows, enhancing the perception of luxury and craftsmanship.
Technical Tips for Setting Up Studio Lighting
- Start with a key light at a 45-degree angle, softened by a large softbox or umbrella.
- Add a fill light or reflector on the opposite side to reduce shadows without flattening the image.
- Use a backlight or hair light to separate the product from the background, adding depth.
- Adjust colour temperature to match your brand’s aesthetic—cooler for tech products, warmer for handmade goods.
- Test shots with colour calibration cards ensure accurate colour reproduction, preventing costly misrepresentations.
How Do Leading UK Industries Leverage Lighting to Boost Product Appeal?
Lighting strategies vary significantly across industries, driven by product characteristics and consumer expectations.
Food and Beverage: Emphasising Freshness and Texture
In the food sector, natural light outshines artificial options for portraying freshness and authenticity. London’s famous Borough Market vendors often rely on window and golden hour lighting to highlight texture and colour vibrancy, which has translated into increased footfall and online orders for artisan foods.
However, for intricate food styling or night shoots, soft studio lighting with daylight-balanced LEDs ensures consistent, mouth-watering images.
Fashion and Accessories: Balancing Mood and Detail
High street fashion brands in Leeds typically use studio lighting to ensure colour accuracy across product ranges, crucial to reducing returns. Yet, lifestyle shots often utilise natural light to add context and emotional connection, enhancing customer engagement by up to 18%.
Jewellery and Luxury Goods: Prioritising Precision and Sparkle
Jewellery photography demands meticulous control over reflections and highlights. Manchester-based jewellers employ multi-light studio setups with snoots and polarising filters to capture brilliance without glare. This precision has led to a reported 25% increase in online inquiries and orders.
Technology and Gadgets: Highlighting Design Features
For tech products, crisp detail and true colour representation are paramount. Brands use controlled artificial lighting setups with softboxes and LED panels to showcase sleek designs, buttons, and interfaces with consistency. This approach is essential when product launches coincide across international markets.
When Should You Choose Natural Light or Studio Lighting for Product Photography?
The decision is rarely binary. Understanding your product, brand, and logistical constraints will guide you.
Natural Light: Best For…
- Products with organic textures or earthy aesthetics, e.g., handmade ceramics, textiles, natural skincare
- Outdoor lifestyle shoots needing authentic ambience
- Startups or small businesses with limited budgets seeking cost-effective solutions
- Social media campaigns that benefit from candid, natural-looking images
Studio Lighting: Ideal For…
- Highly detailed products requiring colour-critical accuracy, such as cosmetics and jewellery
- Catalogues or e-commerce sites demanding uniformity across multiple products
- Night shoots or locations with insufficient natural light
- Complex compositions needing precise light shaping and control
Balancing Both: Hybrid Approaches
Many photographers combine natural and studio light to achieve balanced results. For example, starting with window light as a key source and supplementing shadows with reflector-mounted LED panels provides control without losing natural softness.
An Edinburgh-based artisan chocolatier reported a 22% sales increase after commissioning shoots that blended natural light window setups with studio fill lighting, capturing the product’s richness and texture while maintaining warmth.
What Are the Key Technical and Creative Tips to Optimise Your Lighting Setup?
Beyond the choice of natural or artificial light, mastering the details can elevate your photography.
Colour Accuracy and White Balance
Ensuring your images reflect true product colours is vital. Use grey cards to set custom white balance during shoots. LED lights with adjustable colour temperatures can be fine-tuned to match ambient light, minimising post-processing corrections.
Controlling Shadows and Highlights
Shadows add depth and dimensionality, but harsh shadows can obscure product details. Use diffusers to soften light and reflectors to fill in shadows selectively. When shooting reflective products, polarising filters can reduce unwanted glare.
Background and Surface Choices
Lighting interacts with backgrounds as much as products. Matte surfaces reduce reflections, while glossy backgrounds create dynamic effects but need careful lighting control. Experiment with textured or coloured surfaces to complement your product.
Consistency Across Multiple Shots
For e-commerce, consistency is king. Use fixed lighting setups and mark positions to replicate lighting for every product shoot. This uniformity reassures customers and builds brand trust.
Real-World Results: How Lighting Improvements Impact Conversions
A recent survey of UK online retailers revealed that 78% of consumers consider product photography a key factor in purchasing decisions. Those who invested in professional lighting setups saw conversion rates improve by 22-30% on average.
A compelling example is a Yorkshire-based bespoke furniture maker who revamped their product photography by integrating studio lighting with natural window light. They reported a 27% increase in website enquiries and a 15% reduction in product returns, attributed chiefly to better visual representation of textures and finishes.
Another case is a boutique jewellery brand in London that shifted from natural light only to a hybrid lighting system. The resulting increase in online sales by 25% underscored the value of capturing sparkle and detail consistently, which natural light alone struggled to provide.
Frequently Asked Questions
What is the best time of day for natural light product photography?
The optimal time is during the golden hour, just after sunrise or before sunset, when sunlight is soft and warm. This lighting enhances textures and colours without harsh shadows, creating inviting, authentic images.
How can I control natural light for better product photos?
Use reflectors and diffusers to manage light intensity and soften shadows. Positioning products near north-facing windows provides consistent, indirect daylight. Combining natural light with portable LED panels can fill shadows and add control without overpowering the natural ambience.
What are the advantages of studio lighting over natural light?
Studio lighting provides complete control over intensity, direction, and colour temperature, ensuring consistent, colour-accurate images regardless of weather or time. This is crucial for products requiring precise detail reproduction and uniformity across catalogues.
When should I choose natural light instead of studio lighting?
Natural light is preferable for shoots that benefit from authenticity and mood—such as outdoors or lifestyle-oriented products—and when budget or portability is a concern. It is also excellent for small businesses or artisan brands emphasising organic qualities.
Can I combine natural and artificial lighting?
Absolutely. Combining natural and artificial light allows you to harness the authenticity of daylight while using studio lights to fill shadows and enhance details. This hybrid method yields versatile and striking images adaptable to various platforms.
What equipment is essential for artificial lighting in product photography?
Key equipment includes softboxes and umbrellas for diffused light, LED panels with adjustable colour temperature, reflectors for fill light, and light modifiers like grids and snoots for precise control. A colour calibration card is vital for ensuring accurate colour reproduction.
How can I improve my lighting skills?
Experiment with different lighting setups and positions while analysing how light interacts with your products. Learn to use reflectors, diffusers, and modifiers effectively. Studying lighting in real-world commercial photography and continuous practice are essential for improvement.
Does good lighting really affect product sales?
Yes. Studies from UK e-commerce platforms indicate that professional, well-lit product images can increase sales by up to 30%. Good lighting enhances product appeal, reduces perceived risk, and encourages customer trust.
Is natural light suitable for all types of products?
Natural light suits products with organic textures or those that benefit from a natural, warm aesthetic. However, for products requiring precise colour matching or detailed texture capture (such as jewellery, cosmetics, or tech gadgets), studio lighting is often more reliable.